This tip may be of interest to you if you use a lens that lightroom does not know and therefore isn’t shown in Loupe Info. I’ll explain how to get the lens name into the images with a few tricks and a very useful plugin.
Sometimes you’re shooting with a lens that lightroom does not know – either because it’s an exotic lens or it’s a rather new lens thats not in Lightrooms lens database. Some lenses also use the same lens identification and Lightroom has no chance at all to distinguish them. But if you have only one of these lenses with the same id you can tell Lightroom to use its name correctly.
The following referes to Lightroom 4.4 but should also work with newer versions as well.
This is how it works:
It’s all based on Phil Harvey’s ExifTool – an excellent command line tool (and library) that can ready and modify virtually any meta data from images.
This tool is in turn used by the Lightroom plugin FullMetaExport that makes the functionality of ExifTool usable in Lightroom.
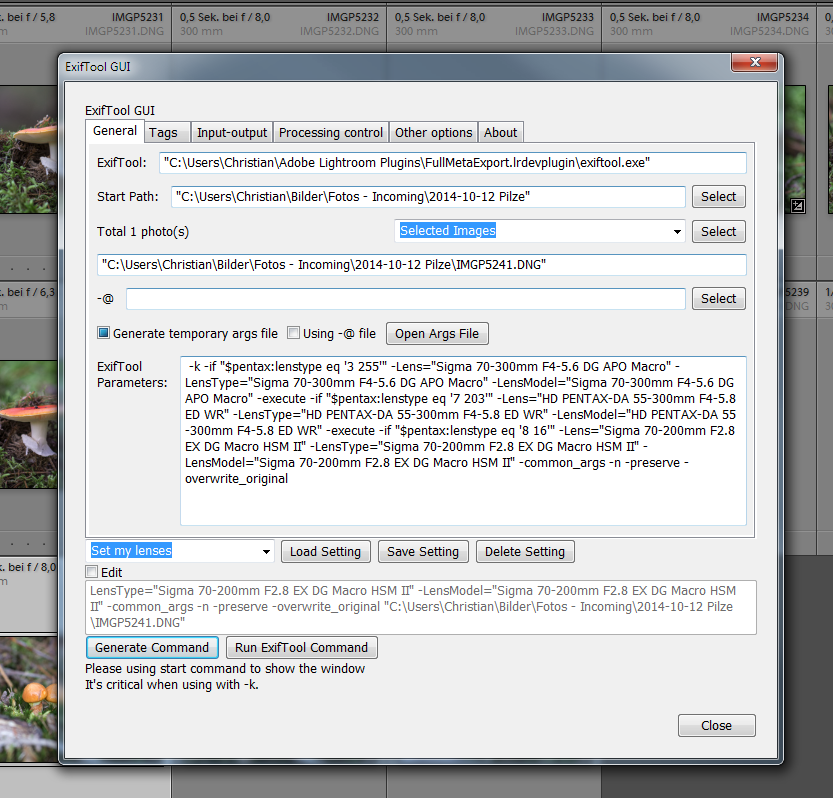
After you have installed both you have an additional menu entry in Lightroom called Library/Plug-in Extras/ExifToolGui. From this plugin you can control the options of the ExifTool in a very clear way. The most interesting thing for us are Extra Options on the tab Other options. Here you can write down the complete command line that will be used when calling ExifTool.
Besides that you only have to watch out that the file path to the ExifTool is set correct on the first tab of the plugin.
The complete command line in the Extra Options that we use looks something like that – make sure that its all written in one single line without a line break:
-if "$pentax:lenstype eq '3 255'"
-Lens="Sigma 70-300mm F4-5.6 DG APO Macro"
-LensType="Sigma 70-300mm F4-5.6 DG APO Macro"
-LensModel="Sigma 70-300mm F4-5.6 DG APO Macro"
-execute
-if "$pentax:lenstype eq '7 203'"
-Lens="HD PENTAX-DA 55-300mm F4-5.8 ED WR"
-LensType="HD PENTAX-DA 55-300mm F4-5.8 ED WR"
-LensModel="HD PENTAX-DA 55-300mm F4-5.8 ED WR"
-execute
-if "$pentax:lenstype eq '8 16'"
-Lens="Sigma 70-200mm F2.8 EX DG Macro HSM II"
-LensType="Sigma 70-200mm F2.8 EX DG Macro HSM II"
-LensModel="Sigma 70-200mm F2.8 EX DG Macro HSM II"
-common_args -n -preserve -overwrite_original
What?
Ok, ok, Thats a bit too much for the beginning. So let’s take a look at one after the other:
As you easily can see is all about identifying the lens by its id. At least thats how it works with Pentax. The homepage of ExifTool lists all the lenses that ExifTool knowns with its ids. You’ll find them in the documentation of the Maker Notes. Just look for Lens Type or Lens ID.
After you know the id of the lens you can write a rule for ExifTool that does something if the image has this lens id in its exif data. After the if clause you write the command that should be executed when the if clause is true. In this case we write the lens’ name into three different storage places (exif tags).
The command line argument -execute is used to simply execute everything on the commandline up to here and start all over. You don’t need this after the last rule because it’s executed anyway.
In the last line of the example above is the -common_args command which tells ExifTool to use all following arguments for all rules and all images. The -preserve tells that the original timestamp should be preserved and the -overwrite_original is used to overwrite the original input file instead of writing a copy. (Note: For testing you should omit the -overwrite_original. This will force ExifTool to write copies that you have to delete afterwards but makes it more save until you know how it works).
If you have only one unknown lens that you want to be assigned, then the commandline could look like this:
-if "$pentax:lenstype eq '3 255'"
-Lens="Sigma 70-300mm F4-5.6 DG APO Macro"
-LensType="Sigma 70-300mm F4-5.6 DG APO Macro"
-LensModel="Sigma 70-300mm F4-5.6 DG APO Macro"
-common_args -n -preserve -overwrite_original
The clou is that by using the -if clause, only the images that are made with the given lens (id) are modified.
Save settings
After you have build your commandline you should save everything using the button Save Settings. Make sure that before you do this you’ve put a proper name into the drop down list.
Using
After you have saved your settings in the ExifToolGui, it’s easy:
First, select all images that you want to modify. It doesn’t matter if you have selected images that are not hit by any of the if clauses. Thats why you made these clauses.
If you have unsaved meta data in Lightroom make sure that you save them before (using the menu Metadata/Save Metadata to File) or Ctrl+S. If you have modified metadata and do not save them, they’ll be lost!
Then use Library/Plug-in Extras/ExifToolGui to open it.
Select the desired setting and hit Load Settings.
Finally, press the buttons Generate Command and Run ExifTool Command.
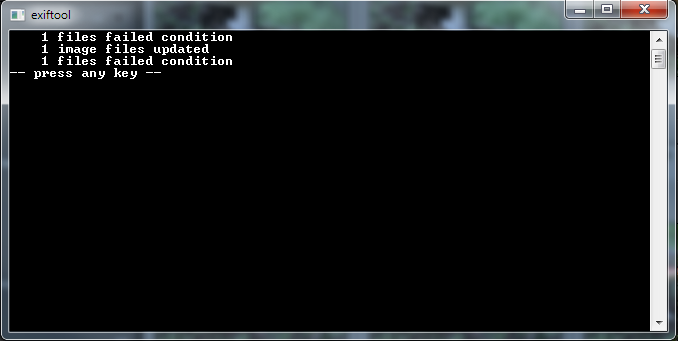
 This should open a DOS-Box that shows you the number of images per rule that hit the condition and were updated and the number of images that failed to hit the condition:
After you closed this DOS-Box by hitting a key you can close the ExifToolGui. Finally you have to load the modified metadata into Lightrooms library with Metadata/Read Metadata from File.
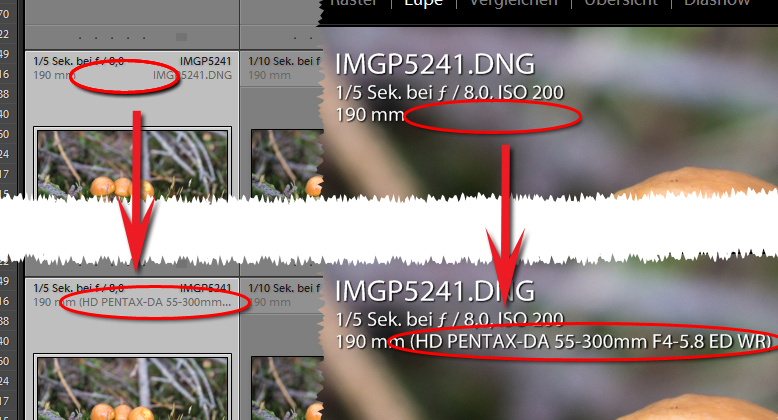
That’s all! Now Lightroom shows the name of the formally unknown lens just like any other. Of course this works also with meta data filters in Lightroom.
More ideas
In a similar way you can assign lens names from old manual lenses that do not even have a lens id. Just omit the -if clause of the command line. Of course you can only set the name of one lens in this way at once but you can define and store different settings for each of your manual lenses. Just make sure that you select the correct images before calling the ExifTool command.